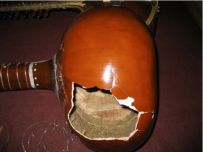
Enfin terminé. Quel bordel ! Vous pouvez regarder des photos des différentes étapes de la réparation. Ce sitar m'a été apporté en réparation par David Kleiner. L'instrument a été cassé pendant le transport en avion. Quelques morceaux de tumba (gourde) manquaient et d'autres étaient trop petits pour que l'on puisse les utiliser.
Après avoir enlevé les bandes de backelite (un matériau, comme chacun sait, constitué de phénol formaldehyde, un ancien type de plastique, inventé aux USA en 1907 par Léo Bakeland, dont la particularité est qu'on ne peut, après lui avoir donné sa forme, en altérer sa forme ou le faire fondre à la chaleur) tout autour du tumba avec la difficulté habituelle puisqu'on en casse invariablement de petits morceaux, je détablai le tabli (table du sitar) qui avait été collé avec un matériau sûrement interdit par la Convention de Genève ! tant la colle était dure - ce qui ne se fait évidemment pas ! Je remarquai alors 2 choses bizarres : La face interne du tumba avait été tapissée d'une mixture de poussière de bois/courge et de colle comme pour réenforcer la gourde, ce qui pourrait laisser penser que cette dernière était déjà endommagée à la fabrication. De plus, il y avait une horrible pièce de bois (voir photo sur la page dédiée) dépassant d'un côté du joint entre tumba et danda (manche) qui aurait dû être au moins coupée à ras. Sans commentaire sur le type (je n'ose utiliser le noble mot luthier) qui a fabriqué le sitar.
Je commençai alors à reconstituer le puzzle et à coller ce qui pouvait l'être. Pour les morceaux manquants, je prélevai - comme pour des greffes - de petits bouts de la gourde à partir de la face interne, morceaux que je taillai au canif et enfonçai en force, au marteau. S'ensuivit le colmatage à la pate à bois, un long ponçage, re-pate à bois, reponçage. Je collai alors le tabli au tumba. Pour combler les interstices entre tabli et tumba, colmatage à la pate à bois, puis ponçage. Je replaçai alors les bandes décorées en backelite puis passai 4 couches d'une mixture de ma composition pour donner à la gourde la consistance et la pigmentation désirées. Après ponçage, je passai successivement 3 couches de vernis au tempon. Je dus fabriquer une pièce d'os servant de support au chikari et faire un nouveau trou, l'ancien étant inopérationnel puisque l'os s'était cassé à ras. Ne restait plus qu'à mettre les cordes, à poncer les chevalets, qu'à coller des cales de bois sur les pieds des chevalets, pour en donner l'angle correct et enfin, à faire les jawaris - c.a.d. à "faire le son". Le travail était enfin achevé après avoir verni les chevalets en place et accroché l'instrument réparé au mur.
Enfin, pour naviguer rapidement dans tous les Albums de photos de la page Musique Indienne, vous pouvez cliquer dans ce lien.
Just finished it. What a mess ! You may see pictures of the different stages of the reparation. The sitar was brought to me for repair by David Kleiner. It got broken in pieces during the flight. Some tumba (gourd) pieces were missing and others were so small that I could do nothing with them.
After removing the backelite stripes (as everyone knowsn a material made of phenol formaldehyde - old type of plastic - invented in 1907 by Leo Bakeland in USA, which, once shaped, cannot be softened by application of heat) around the tumba with the usual difficulty as it unvariably gets broken at places, I removed the tabli (sitar table) which had been glued with a material which is surely prohibited by the Geneva Convention - so hard it was to separate it from the tumba ! I then noticed two weird things : the inner tumba was coated with a mixture of wood powder and glue as to reinforce it... It could mean that the tumba was already damaged or broken at places. The second thing was that there was an uncanny wood piece sticking out of the joint between tumba and neck... No comments on the guy who did it.
I then started to reconstitute the puzzle and glued what I could together. For missing pieces, I withheld some material from inside the gourd, cut it to size and fitted it. I then finished up with wood paste, sandpapered it for long, reput some wood paste, resandpapered. Tabli was reglued to tumba. As they were interstices, I filled them up with wood paste, sandpapered, replaced the backelite decoration stripes and applied 4 layers of a coating of my composition to give color and consistancy. After sandpapering, I applied 3 layers of alcohol varnish with a piece of cloth. I shaped a piece of bone for the higher chikari as the original one was clean broken at the level of the neck and had to drill a new hole for placing it. Strings were replaced, Bridges were shaped and pieces of wood added to give the proper angle. At last, jawaris were done. Work was done after varnishing the bridges into place and hanging the sitar on the wall !
Last but not least, to quickly browse the contents of all Picture Albums of the Indian Music Page, you may click this link.


